I have always adored the story The Polar Express. I love how it tells the story of Christmas magic, and believing! Back in the day when I taught preschool, having a day dedicated to this story was always so much fun, and a big hit for all the kids! So, for our MOMS club, I decided to host a Polar Express Holiday Party!
All the kids wore their pajamas, and looking back at some pictures I seem to be one of the only adults who wore mine! hehe When everyone walked in they were handed a golden ticket!
A table was setup for the kids--
I baked some sugar cookies earlier that day, and in the little bowls were sprinkles, marshmallows, different colored icing, etc. Everyone decorated a couple of cookies, and we also had hot chocolate! YUM! Although, it was a little too hot, and by the time it cooled down enough for the kids they were over it! :D
In the living room Connor and I made a train from cardboard boxes. It looked cute, and was fun! However only lasted a ten minutes until it became many other things!
All the kids played, the MOMS chatted, and the movie was on in the background!
We also had a book exchange. Which I didn't get any pictures of. Everyone brought a wrapped book. I had a paper train cut out with numbers on them, and taped on of the cars to each book. I then had each kid draw a number, and that was the book they got to take home!
~* Happy Holidays Everyone!! *~
Showing posts with label winter. Show all posts
Showing posts with label winter. Show all posts
Wednesday, December 21, 2011
Polar Expres Party
Labels:
all ages,
books,
christmas,
silhouette,
winter
Friday, January 21, 2011
Painting with "snow"
This mixture makes a pretty cool looking picture. Mix some glue with shaving cream, and then paint with it. We also added some silver glitter! When it dries the shaving cream keeps a puffy soft look! It's cool to look at, and to feel! We called it snow!
Thursday, January 20, 2011
Polar Bear, Polar Bear
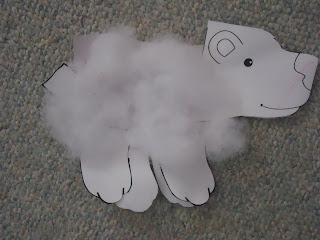
We have been talking about arctic animals this week. Today we read "Polar Bear, Polar Bear, What Do You Hear?" By Bill Martin Jr, and Eric Carle. This book is a lot of fun, and great for learning new animal sounds! I love the repetition this book has!
Afterwards we created a simple panda with some cotton! We talked about soft/hard, and the color white!
Afterwards we created a simple panda with some cotton! We talked about soft/hard, and the color white!
Monday, January 17, 2011
Name Snowman
We have been doing a few name recognition activities. Today I came up with the idea of building snowmen using letters from our names. First I wrote a letter on each white circle, and we talked about the letters we saw, and the sounds. Then I wrote each name on a sheet of paper, and we played a matching game. For example, they had to put the 'c' circle on the 'c' on the paper. They were kind of young for it, but it was a good start! Then I helped them glue it in order, and we decorated them as snowmen! :) Fun!
Labels:
early literecy,
language development,
letters,
name recognition,
snow,
winter
Sunday, January 16, 2011
Penguins
Today we read a few books on penguins. We talked about the colors, where they live, etc. Then I had everyone paint a penguin cutout black, then we glued penguin parts on it. Here is Connor's!
Saturday, January 15, 2011
Playing in snow
Snow is good for some things. I see it as a big sensory table! You can use the same kind of toys that you would use to play with sand, and learn the same concepts. You can fill and dump, measure, pour, sift, feel, rub, pat, and best of all its kind of relaxing. You can also work on gross motor skills on it. Especially since just basic walking in it can be a bit more tricky and require extra work! There is no wrong way to play with this material. I love it because it is so open ended. You can just simply shovel a little, or make a big igloo. There is so much to learn from it, and if your dressed appropriately you can enjoy it at any age! Plus, getting some fresh air during a season we usually spend the majority of the time indoors is great!
Looking at it from this perspective makes me a little more tolerable of the stuff! :D
Looking at it from this perspective makes me a little more tolerable of the stuff! :D
Labels:
fine motor skills,
gross motor,
math,
nature,
outdoor,
science,
sensory tubs,
snow,
winter,
worksheet alternatives
Monday, January 10, 2011
Snowman Blob
This was a lot of fun! I didn't tell the kids what we were going to make. Just had them paint white on a paper. After it dried, I told them we are going to turn the blobs into snowmen! I gave them some 'snowman parts,' and we glued them on! They thought it was funny that their once white blobs, now look like a snowman!
Sunday, January 9, 2011
Snowman Sponge
I bought a snowman shaped sponge from Michaels the other day. Today we painted with it, and made cool snow mam shapes!
Friday, December 17, 2010
Snow Cream!
I Love snow cream! It really is so tasty! I found this recepie online, and we really enjoyed it!
Sandy's Old-time Snow Cream Recipe
Basic Recipe
1 cup milk
1/2 cup sugar
scant 1/2 teaspoon vanilla
large bowl of snow (about 3 quarts)
Blend milk, sugar and vanilla. Stir in enough snow to make snow cream to
an ice cream consistency.
Variations - There are many variations for snow cream. For example,
substitute canned cream for milk for a heavier flavor. Add Nestles Quik
for a chocolate snow
cream, or use instant cocoa mix. Another variation is to add plump
raisins and cinnamon, or add a beaten egg for a nog taste. Puree an
overripe banana and add to
the mixture. Get creative - you know your family's tastes.
Note: ALWAYS - ALWAYS make sure the snow is clean. It takes at least one
to two hours for snow to clean the pollutants from the air, then use
only snow that
has fallen after that first cleansing snow. It also goes without saying
(but I will anyway), to make sure you do not collect the snow where
animals and birds eat (or do
other things). Cleanliness first. Stress that with the kids, because
this is a treat even the younger ones can make for the whole family.
Labels:
cooking,
food,
sensory tubs,
snow,
winter
Friday, December 10, 2010
Christmas Handprint Wreath
This project took some advance planning.
A few days before hand I traced each child's hand print. Then I made several copies of them. The kids (3+) cut their own out of the paper. Next I cut the inside of a paper plate out, leaving just the outside. I had to play around with each child's hand print to find how much we needed to go around their plate.
Next, we were ready to make the wreath! I worked one on one with each child to help them glue their hands on. Then we painted our wreaths with green glitter paint!
After they were dried, we glued red "berries" on, and I added a bow!
I loved the way they turned out, so it became our door decoration for all to see :D
Subscribe to:
Posts (Atom)


